I am starting my blog in English for the first time.
The purpose is to make it easier to use commands or scripts provided in the videos on YouTube.
The topic for this week is Cross-tenant Mailbox Migration.
I have carried out the process in the simplest Only Cloud environment, and I will cover Azure AD Sync and Exchange Hybrid scenarios later. To understand the principles of Migration, you need to understand the principles of Migration in Exchange Server. I will update this part later.
I have referred to the following technical documentation to write this.
Cross-tenant mailbox migration - Microsoft 365 Enterprise | Microsoft Learn
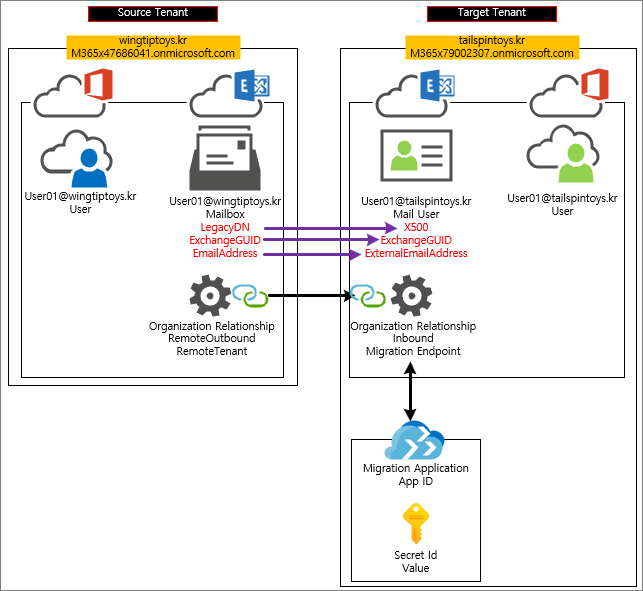
Migration Scenario Diagram

[Test Environment]
Source Tenant
Tenant: M365x47686041.onmicrosoft.com
Custom domain: wingtiptoys.kr

Target tenant
Tenant: M365x79002307.onmicrosoft.com
Custom domain: tailspintoys.kr

Since it is a tenant environment, there is no process for assigning cross-tenant migration licenses.
Without the appropriate license, migration is not possible, so we conducted the test using a shared mailbox.

Step 1. Prepare the target (destination) tenant by creating the migration application and secret

Access https://entra.microsoft.com (Target Tenant) -> search for "app registrations" -> click

New Registration

Enter the information as shown below and then click Register

Record it as the AppID of the Target Tenant.
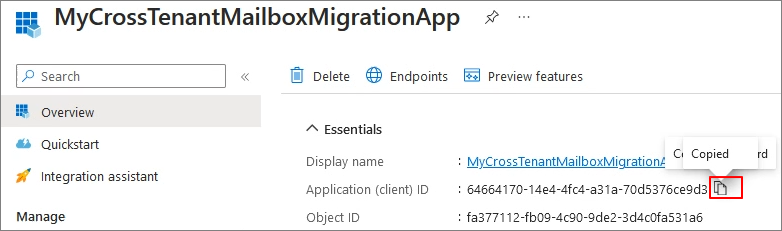
API Permissions -> Add a permission
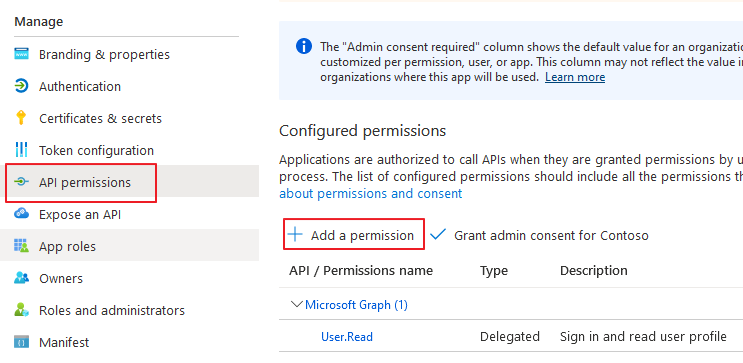
APIs my organization uses -> Office 365 Exchange Online -> Office 365 Exchange Online

Application permissions -> Mailbox.Migration -> Add permission

Confirm

Certificates & secrets -> New client secret

Description -> Add

Copy & Record the Value

Enterprise Application -> Click the migration app
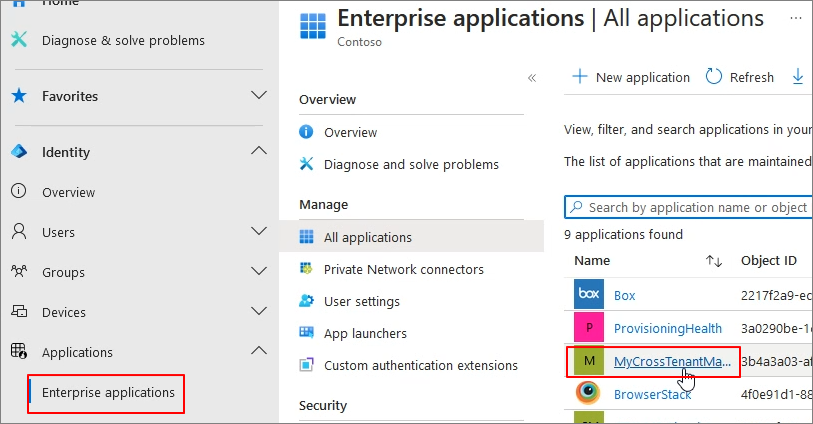
Permissions -> Grant admin for Tenant name

Accept

Confirm

After opening a new browser window, access the following URL: (Source Tenant + App ID)
https://login.microsoftonline.com/contoso.onmicrosoft.com/adminconsent?client_id=[application_id_of_the_app_you_just_created]&redirect_uri=https://office.com

#Example
https://login.microsoftonline.com/M365x85148890.onmicrosoft.com/adminconsent?client_id=d8afba35-2ae3-4b42-89f2-8511bfb42bd2&redirect_uri=https://office.com
Accept

Step 2. Prepare the target tenant by creating the Exchange Online migration endpoint and organization relationship
Connect Exchange Online Powershell (Target Tenant)

#Enable customization if tenant is dehydrated
Get-OrganizationConfig | select isdehydrated
Enable-OrganizationCustomization
$AppId = "[guid copied from the migrations app]"
$AppId = "d8afba35-2ae3-4b42-89f2-8511bfb42bd2"
#Create Migration Endpoint
$Credential = New-Object -TypeName System.Management.Automation.PSCredential -ArgumentList $AppId, (ConvertTo-SecureString -String "[this is your secret password you saved in the previous steps]" -AsPlainText -Force)
New-MigrationEndpoint -RemoteServer outlook.office.com -RemoteTenant "sourcetenant" -Credentials $Credential -ExchangeRemoteMove:$true -Name "[the name of your migration endpoint]" -ApplicationId $AppId

#Sample
$Credential = New-Object -TypeName System.Management.Automation.PSCredential -ArgumentList $AppId, (ConvertTo-SecureString -String "1x38Q~7-d-hdD92Ue9Or5A2ilTkO-n7C1p2raaWX" -AsPlainText -Force)
New-MigrationEndpoint -RemoteServer outlook.office.com -RemoteTenant "M365x85148890.onmicrosoft.com" -Credentials $Credential -ExchangeRemoteMove:$true -Name "wingtiptoys" -ApplicationId $AppId
Looking at the command structure, you can think of the created Migration Application as being connected as follows.

The endpoint is connected by designating the Remote tenant as the Source tenant.

#Create Organization Relationship
$sourceTenantId="[tenant id of your trusted partner, where the source mailboxes are]"
$orgrels=Get-OrganizationRelationship
$existingOrgRel = $orgrels | ?{$_.DomainNames -like $sourceTenantId}
If ($null -ne $existingOrgRel)
{
    Set-OrganizationRelationship $existingOrgRel.Name -Enabled:$true -MailboxMoveEnabled:$true -MailboxMoveCapability Inbound
}
If ($null -eq $existingOrgRel)
{
    New-OrganizationRelationship "[name of the new organization relationship]" -Enabled:$true -MailboxMoveEnabled:$true -MailboxMoveCapability Inbound -DomainNames $sourceTenantId
}
---------------------------------------------------------------
$sourceTenantId="a18c909b-006a-404f-8666-c2ccae261bcd"
$orgrels=Get-OrganizationRelationship
$existingOrgRel = $orgrels | ?{$_.DomainNames -like $sourceTenantId}
If ($null -ne $existingOrgRel)
{
    Set-OrganizationRelationship $existingOrgRel.Name -Enabled:$true -MailboxMoveEnabled:$true -MailboxMoveCapability Inbound
}
If ($null -eq $existingOrgRel)
{
    New-OrganizationRelationship "wingtiptoys" -Enabled:$true -MailboxMoveEnabled:$true -MailboxMoveCapability Inbound -DomainNames $sourceTenantId
}
MailboxMoveCapability is understood as specifying the direction of Cross-Tenant Mailbox Migration.

Copy the Tenant ID from the Source Tenant
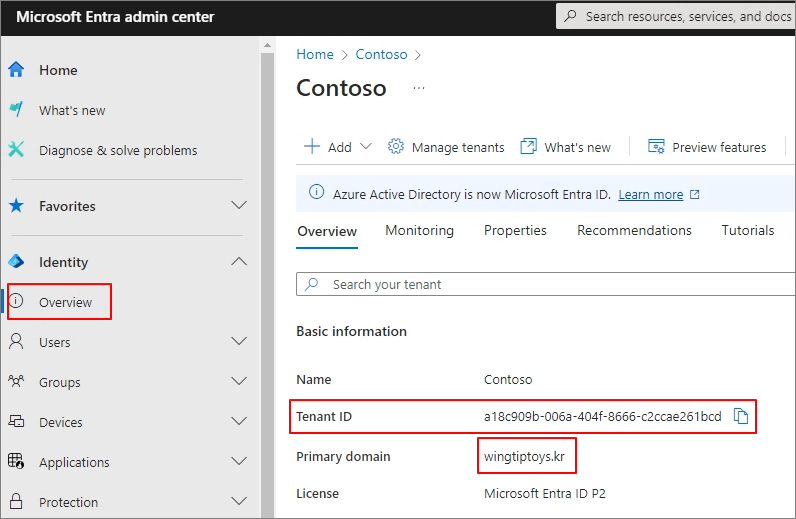
$sourceTenantId="a18c909b-006a-404f-8666-c2ccae261bcd"

It appears that the migration direction has been enabled as shown below.

Step3. Prepare the source (current mailbox location) tenant by accepting the migration application and configuring the organization relationship
It can be understood as granting permissions related to app usage in the Source Tenant as shown below.

Source Tenant -> Exchange Admin Center -> Create Mail-enabled security

Enter the name

Add the mailboxes to be migrated to the specified group.

Assign address -> Complete creation

Connect Exchange Online Powershell (Source Tenant)

Create Organization Relationship for the Source Tenant
$targetTenantId="[tenant id of your trusted partner, where the mailboxes are being moved to]"
$appId="[application id of the mailbox migration app you consented to]"
$scope="[name of the mail enabled security group that contains the list of users who are allowed to migrate]"
   $orgrels=Get-OrganizationRelationship
$existingOrgRel = $orgrels | ?{$_.DomainNames -like $targetTenantId}
If ($null -ne $existingOrgRel)
{
    Set-OrganizationRelationship $existingOrgRel.Name -Enabled:$true -MailboxMoveEnabled:$true -MailboxMoveCapability RemoteOutbound -OAuthApplicationId $appId -MailboxMovePublishedScopes $scope
}
If ($null -eq $existingOrgRel)
{
    New-OrganizationRelationship "[name of your organization relationship]" -Enabled:$true -MailboxMoveEnabled:$true -MailboxMoveCapability RemoteOutbound -DomainNames $targetTenantId -OAuthApplicationId $appId -MailboxMovePublishedScopes $scope
}
Example
$targetTenantId="27359b9a-645f-424d-b4f2-526903be2546"
$appId="d8afba35-2ae3-4b42-89f2-8511bfb42bd2"
$scope="Migrationgroup"
   $orgrels=Get-OrganizationRelationship
$existingOrgRel = $orgrels | ?{$_.DomainNames -like $targetTenantId}
If ($null -ne $existingOrgRel)
{
    Set-OrganizationRelationship $existingOrgRel.Name -Enabled:$true -MailboxMoveEnabled:$true -MailboxMoveCapability RemoteOutbound -OAuthApplicationId $appId -MailboxMovePublishedScopes $scope
}
If ($null -eq $existingOrgRel)
{
    New-OrganizationRelationship "ToTargetTenant" -Enabled:$true -MailboxMoveEnabled:$true -MailboxMoveCapability RemoteOutbound -DomainNames $targetTenantId -OAuthApplicationId $appId -MailboxMovePublishedScopes $scope
}
The RemoteOutbound and Inbound relationship settings have been completed through the Organization Relationship settings of each tenant.

Step 4. Create MailUser
Check the properties of the migration mailbox in the Source Tenant
Get-Mailbox -Identity user01 |Select-Object PrimarySMTPAddress,Alias,SamAccountName,FirstName,LastName,DisplayName,Name,ExchangeGuid,ArchiveGuid,LegacyExchangeDn,EmailAddresses
Create a Mail User in the Target Tenant
New-MailUser -MicrosoftOnlineServicesID User01@tailspintoys.kr -PrimarySmtpAddress User01@tailspintoys.kr -ExternalEmailAddress user01@wingtiptoys.kr -Name User01 -DisplayName User01 -Alias User01

Set-MailUser -Identity User01 -EmailAddresses @{add="X500:Type the LegacyExchangeDN"} -ExchangeGuid "Type the ExchangeGuid"

#In scenarios where the existing domain needs to be completely removed, enter the onmicrosoft.com address and designate it as the target delivery domain.
Set-MailUser -Identity User01 -EmailAddresses @{add="smtp:user01@M365x47686041.onmicrosoft.com"}
The attributes were created to map as follows.
Check the migration connection status with the following command.
Test-MigrationServerAvailability -Endpoint "wingtiptoys" -TestMailbox "user01@tailspintoys.kr"
Step 5. Migration
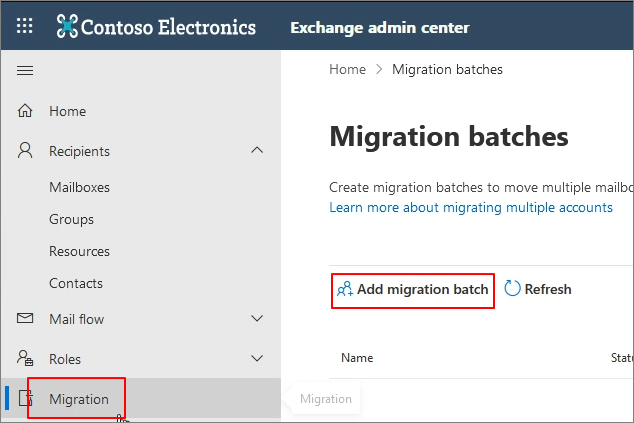
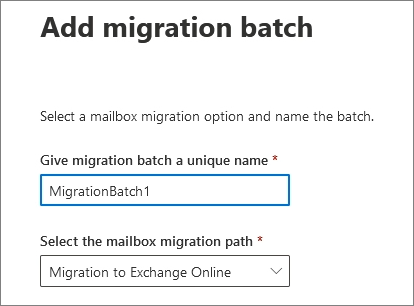
Migration -> Add Migration batch
Migration to Exchange Online -> Next
Cross tenant migration -> Next

Next

Select migration endpoint ->Next

Import CSV file

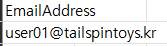
Create a CSV with the Target Email Address and proceed with the import.
Enter target delivery domain

Save

Synchronization proceeds as shown below.


After checking the license assignment status, click Complete migration batch. ->
If the migration is complete, remove the batch.

You can confirm the migrated mailboxes as shown below.

And the existing Source Mailbox is changed to a Mail User.
Since the External Address is the Target Tenant address, any emails received after the transition will be forwarded to the Target Tenant.

The overall migration flow is not significantly different from Exchange hybrid or Cross-Forest.
