In order to reduce confusion between Azure AD and Windows Server AD, Microsoft changed Azure AD to Entra ID, marking the beginning of the Entra product family.
Microsoft renamed Azure AD (Azure Active Directory) to Microsoft Entra ID to convey the product's multi-cloud, multi-platform capabilities, alleviate confusion with Windows Server Active Directory, and integrate it into the Microsoft Entra product family.
This change makes sense because the AD people are familiar with is actually Active Directory Domain Services (AD DS). To put it simply, Azure AD only manages identities, while policies for devices joined to Azure AD are managed by Intune's Configuration Profile. In other words, the cloud version of AD is a combination of Azure AD + Intune. It was difficult to explain this concept to those who have been accustomed to the traditional AD model for a long time.
By rebranding it as Entra, Microsoft is positioning it as a comprehensive identity and access management platform. When you access the Entra Management Center, you'll notice that it offers more features than when it was known as Azure AD.
Let's take a closer look at Verified ID. We will start with the following technical resource:
First, the background for the emergence of Verified ID is as follows:
In today’s world, our digital and physical lives are increasingly intertwined with the apps, services, and devices we use. This digital revolution opens up a world of possibilities, allowing us to connect with numerous companies and individuals in ways previously unimaginable.
However, with this increased connectivity comes a greater risk of identity theft and data breaches. These breaches can have significant impacts on both our personal and professional lives. But there is hope. Microsoft, in collaboration with various communities, has developed a decentralized identity solution that enables individuals to control their own digital identity, offering a secure and private way to manage identity data without relying on centralized authorities or intermediaries.
-> The key here is the Decentralized Identity solution. To be honest, the other concepts are a bit difficult for me to explain in more detail at my current level. Looking at this… if I had deep-dived into identity management alone, I probably wouldn’t have any trouble making a living.
I think I need to test how to use this practically and eventually gain a better understanding through hands-on experience.
Lead with open standards
Microsoft has implemented the following standards:
W3C Decentralized Identifier
W3C Verifiable Credentials
DIF Sidetree
DIF Well Known DID Configuration
DIF DID-SIOP
DIF Presentation Exchange
-> This suggests that it's not only something used in M365 but is a concept that can be integrated with other systems, similar to SSO or in a different capacity.
What is DID (Decentralized ID)?
DID is an identity management system where individuals, not central authorities or corporations, have direct control over the ownership and management of their identity information.
It ensures the integrity and security of identity information through a decentralized network rather than relying on central servers or institutions. Distributed ledger technologies, such as blockchain, are typically used, with the goal of giving individuals full control over their identity information.
So, what is Microsoft Verified ID? My understanding is that it plays the role of the issuer, verifier, and intermediary (Role Modeler).
The content explained by each item in the diagram is as follows:
1. W3C DID (Decentralized Identifier) Number
- A unique ID.
2. Trust System
- It verifies and authenticates to check DID documents.
3. MS Authenticate App
- Serves as a digital wallet. You can think of it like a wallet where the user stores their ID cards.
4. Microsoft Resolver
- An API that uses the did:web method to query and verify DIDs, returning the DDO (DID Document Object).
5. Microsoft Entra Verified ID API
- A REST API for issuing and verifying W3C Verifiable Credentials, signed using the did:web method, through Azure’s issuance and verification services.
In order to cover this flow in detail, it seems necessary to build a concrete sample environment to fully understand it.
Once I’ve built a sample, posted about it, and gained a reasonable understanding, I will update this post accordingly.
Continuing from the previous post, this time we will implement the functionality to compose and send emails using the Mail.Send permission of the Graph API.
We'll continue using the project created in the previous post.
The process pattern is somewhat established at this point:
Step 1: Add Mail.Send permission
Step 2: Create a ViewModel for sending emails
Step 3: Create a View for composing and sending emails
Step 4: Add the Action Method for sending emails
Step 1. Add Mail.Send permission
Appsettings.json
Add Mail.Send permission.
Step 2. Create a View Model for Sending Emails
Create the EmailSendViewModel to hold the data needed for sending emails. This model will include fields like recipient address, email subject, and email body.
Create the EmailSendViewModel class
public class EmailSendViewModel
{
        public string To { get; set; } = string.Empty;
        public string Subject { get; set; } = string.Empty;
        public string Body { get; set; } = string.Empty;
}
Step 3. Create a View for Sending Emails
Create a view (SendEmail.cshtml) in the Views/Home directory, where users can compose and send emails. This view will use the EmailSendViewModel as its model.
Add the SendEmail action method to the HomeController. This method accepts EmailSendViewModel as a parameter and sends an email using the Microsoft Graph API.
Modify HomeController.cs.
Add the following content.
// GET action method to display the email sending form
[HttpGet]
public IActionResult SendEmail()
{
    return View(new EmailSendViewModel()); // Pass an empty model to the view
}

// Sendemail
[HttpPost]
[AuthorizeForScopes(ScopeKeySection = "MicrosoftGraph:Scopes")]
public async Task<IActionResult> SendEmail(EmailSendViewModel model)
{
    var message = new Message
    {
        Subject = model.Subject,
        Body = new ItemBody
        {
            ContentType = BodyType.Text,
            Content = model.Body
        },
        ToRecipients = new List<Recipient>()
        {
            new Recipient
            {
                EmailAddress = new EmailAddress
                {
                    Address = model.To
                }
            }
        }
    };

    await _graphServiceClient.Me.SendMail(message, null).Request().PostAsync();

    return RedirectToAction("Index");
}
Continuing from the previous post, this time we will use the Mail.Read permission in the Graph API to retrieve mail folders, subject lines, and content, and publish them on IIS.
We will continue using the project created in the previous post.
Add the //Email Titles section to the existing code as shown below.
using Identity.Models;
using Microsoft.AspNetCore.Authorization;
using Microsoft.AspNetCore.Mvc;
using System.Diagnostics;
using Microsoft.Graph;
using Microsoft.Identity.Web;

namespace Identity.Controllers
{
    [Authorize]
    public class HomeController : Controller
    {
        private readonly GraphServiceClient _graphServiceClient;
        private readonly ILogger<HomeController> _logger;

        public HomeController(ILogger<HomeController> logger, GraphServiceClient graphServiceClient)
        {
            _logger = logger;
            _graphServiceClient = graphServiceClient;
        }

        [AuthorizeForScopes(ScopeKeySection = "MicrosoftGraph:Scopes")]
        public async Task<IActionResult> Index()
        {
            var user = await _graphServiceClient.Me.Request().GetAsync();
            ViewData["GraphApiResult"] = user.DisplayName;
            return View();
        }

        // Email Titles
        [AuthorizeForScopes(ScopeKeySection = "MicrosoftGraph:Scopes")]
        public async Task<IActionResult> EmailTitles()
        {
            var messages = await _graphServiceClient.Me.Messages
                .Request()
                .Select(m => new { m.Subject })
                .GetAsync();

            var titles = messages.Select(m => m.Subject).ToList();
            return View(titles);
        }

        public IActionResult Privacy()
        {
            return View();
        }

        [AllowAnonymous]
        [ResponseCache(Duration = 0, Location = ResponseCacheLocation.None, NoStore = true)]
        public IActionResult Error()
        {
            return View(new ErrorViewModel { RequestId = Activity.Current?.Id ?? HttpContext.TraceIdentifier });
        }
    }
}
Create the View.
Views -> Home -> Add -> View
Razor View -> Empty -> Add
EmailTitles.cshtml -> Add
It will be generated as shown below.
Modify the content as follows.
@model List<string>

<h2>Email Titles</h2>
<ul>
@foreach (var title in Model)
{
    <li>@title</li>
}
</ul>
Start Debuging -> Log in -> Verify permissions and click Accept.
When you navigate to the Home/emailtitles URL, it will be displayed as shown below.
When compared with OWA (Outlook Web App), you can see that only the email subjects have been retrieved.
This time, let's create a page that retrieves and displays emails in the following structure: Folder -> Subject -> Body.
Step2. Action Method
Action Methods in the controller handle HTTP requests and retrieve data by calling the Microsoft Graph API. We will implement Action Methods such as MailFolders, EmailTitles, and EmailDetails to fetch the list of mail folders, the list of emails in a specific folder, and the detailed content of an email, respectively.
Modify the HomeController.cs file
Remove the existing Email Titles code.
Insert the code for Mail Folders, Titles, and Details respectively.
//MailFolders
public async Task<IActionResult> MailFolders()
{
    var mailFolders = await _graphServiceClient.Me.MailFolders
        .Request()
        .GetAsync();

    return View(mailFolders.CurrentPage.Select(f => new MailFolderViewModel { Id = f.Id, DisplayName = f.DisplayName }).ToList());
}

//EmailTitles
public async Task<IActionResult> EmailTitles(string folderId)
{
    var messages = await _graphServiceClient.Me.MailFolders[folderId].Messages
        .Request()
        .Select(m => new { m.Subject, m.Id })
        .GetAsync();

    var titles = messages.CurrentPage.Select(m => new EmailViewModel { Id = m.Id, Subject = m.Subject }).ToList();
    return View(titles);
}

//EmailDetails
public async Task<IActionResult> EmailDetails(string messageId)
{
    var message = await _graphServiceClient.Me.Messages[messageId]
        .Request()
        .Select(m => new { m.Subject, m.Body })
        .GetAsync();

    var model = new EmailDetailsViewModel
    {
        Subject = message.Subject,
        BodyContent = message.Body.Content
    };

    return View(model);
}
Step3. View model
A View Model is a model used to pass data to the View and is used to define the data retrieved from the Action Method. For example, the EmailViewModel includes the email's ID and subject. This allows the data needed in the view to be structured and managed efficiently.
Right-Click on the Models folder -> Add -> Class
MailFolderViewModel.cs -> Add
It will be generated as shown below.
Modify it as shown below.
namespace Identity.Models
{
    public class MailFolderViewModel
    {
        public string Id { get; set; }
        public string DisplayName { get; set; }
    }
}
Similarly, go to Models -> Add -> Class.
EmailViewModel.cs -> Next
Modify it as shown below -> Save.
namespace Identity.Models
{
    public class EmailViewModel
    {
        public string Id { get; set; }
        public string Subject { get; set; }
    }
}
Add EmailDetailsViewModel.cs in the same way.
Modify it as shown below -> Save.
public class EmailDetailsViewModel
{
    public string Subject { get; set; }
    public string BodyContent { get; set; }
}
Step 4. View
Finally, the View constructs the user interface and displays the data received from the View Model. Create corresponding view files for each action in the Views/Home directory.
Authentication type -> Microsoft identity platform -> Create
Next
Sign in -> Microsoft
Log in with the administrator account.
Create new
A browser window pops up. Log in with the administrator account.
Authentication complete.
Specify the Display name. -> Register
Confirm that the creation is successful.-> Next
Add Microsoft Graph permissions -> Next
Save the Client secret value in a notepad.-> Next
Finish
Close
Close
Service is registered, and verify that Secrets.json (Local) has been created.
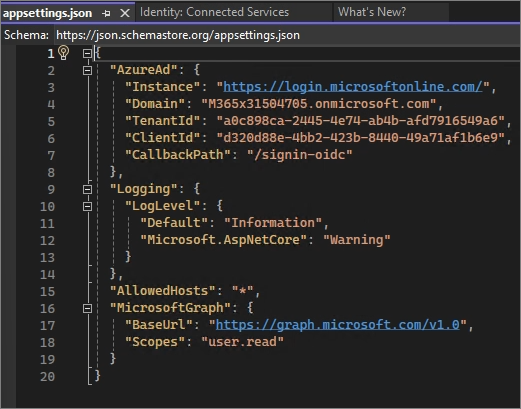
Double-click on the Appsettings.json file.
The information for the created app is displayed.
The same information is confirmed in Entra ID.
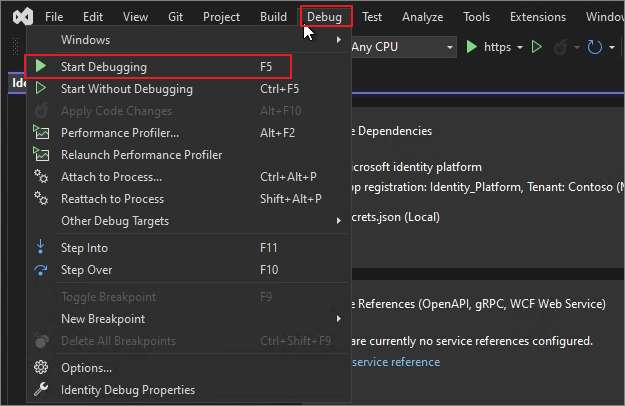
Start Debugging
After accessing localhost, you're redirected directly to the login page -> Log in with the administrator account.
Upon first access, the permissions are displayed as shown below -> Click Accept. -> Accept
Display the logged-in account information.
When you sign out, the following message is displayed.
When you log in with a different account, it displays the information of that account.
Build -> Identity
Web Server (IIS) -> Next
Web Deploy Package -> Next
Specify the location to export the package -> Set the Site Name -> Click Finish.
Close
Publish
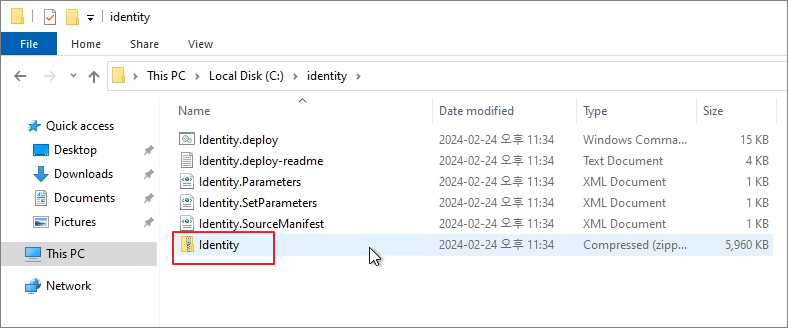
Once completed, copy the package file to the IIS Server.
As done in the previous post, after extracting the files, copy the essential folders and files, such as wwwroot, to the root directory as shown below.
Launch IIS Manager
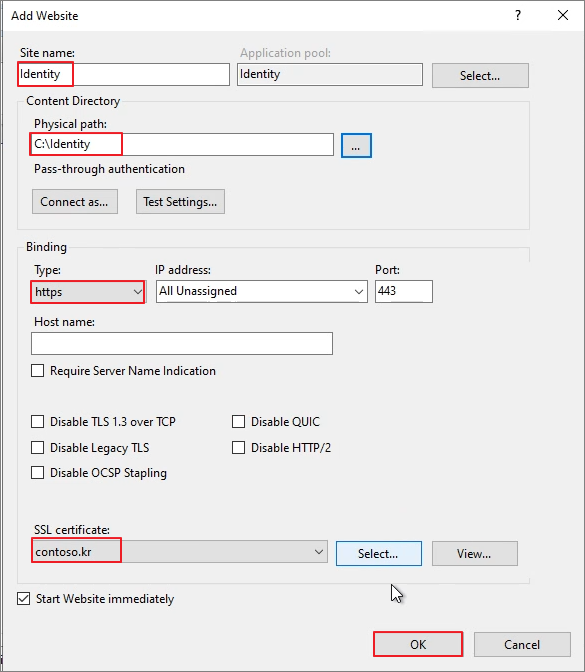
Righ-Click on Sites -> Add Website
Specify the settings as shown below.
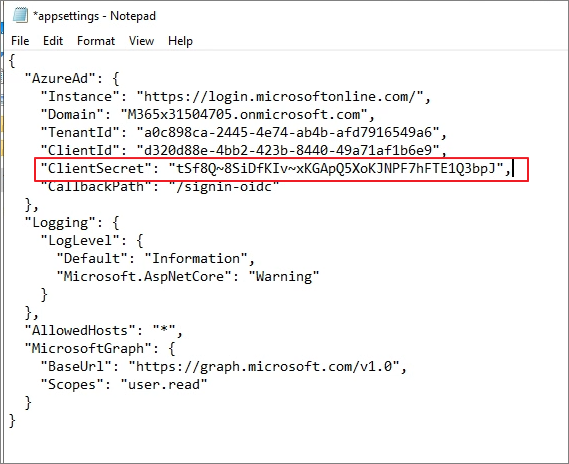
When testing on localhost, an Error 500 occurs as shown below. The cause is that the ClientSecret value is not included during publishing, which leads to this issue.
Open the Appsettings.json file using Notepad.
Add the previously saved Secret Value in the following format -> Save the file:
IISRESET
Confirm the login process.
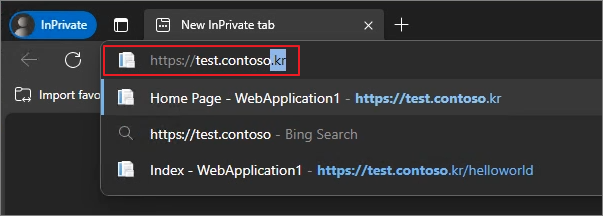
Proceed with testing by accessing the published URL.
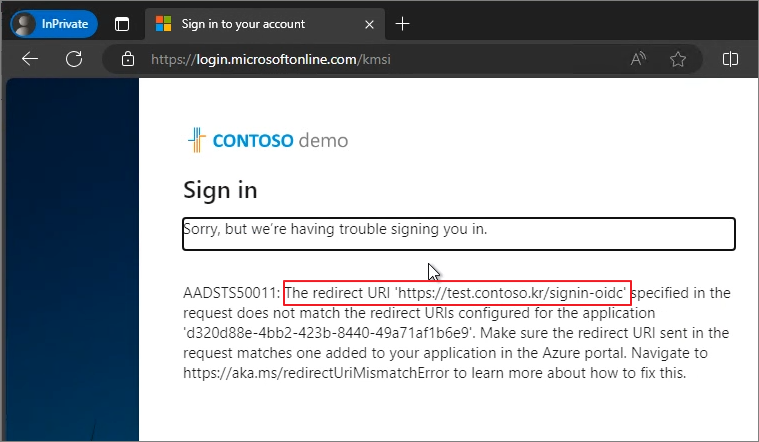
A Redirect URI error has occurred.
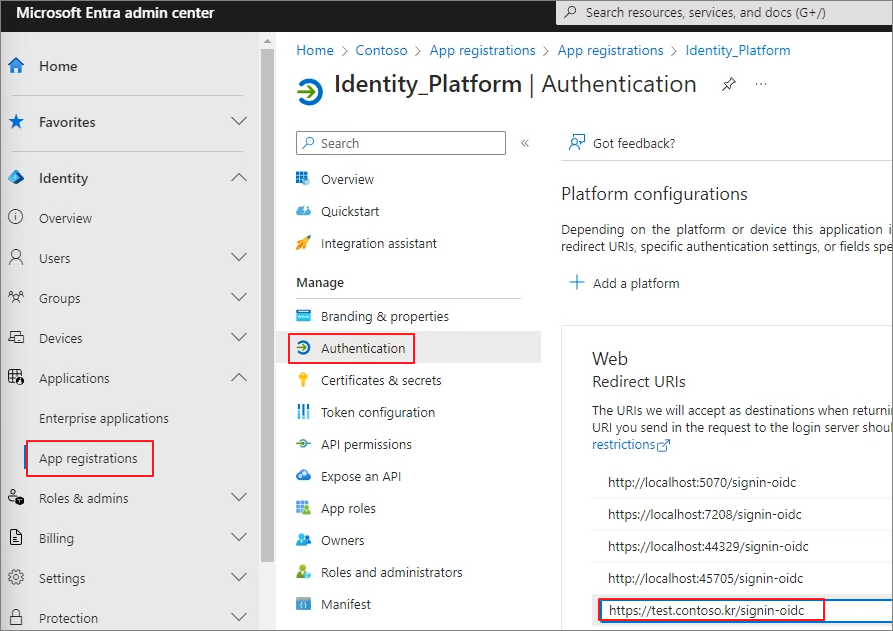
Entra ID Admin center -> Applications -> App registration -> Authentication -> Add the following to Redirect URIs as shown below.
In this post, we will cover the process of publishing an ASP.NET Sample Page to IIS. Since most Microsoft solutions are based on ASP.NET, I thought this would be a necessary step before testing Graph.
ASP.NET Core Web App (Model-View-Controller) -> Next
Next
Verify that the Framework is set to .NET 8.0 -> Click "Create" (You will need to install the Runtime and SDK version 8.0 on IIS to match this setting.)
Solution Explorer -> Controllers -> Add -> Controller
MVC Controller - Empty -> Add
Name the controller as HelloWorldController. -> Add
Right-Click on Views -> Add -> New Folder
Name it HelloWorld.
Right-click on HelloWorld.-> Add -> New Item
If the following options appear, select Show All Templates.
Razor View - Empty -> Confirm the name as Index.cshtml. -> Add
Verify that it has been created under the HelloWorld folder.
다음과같이입력합니다.
ViewData["Title"] = "Index";

<h2>Index</h2>
<p>Hello from the HelloWorld view!</p>
Debug -> Start Debugging
If any messages related to SSL certificates appear, click "Yes" for all of them.
Yes
Yes
Yes
The sample page is now accessible in Edge.
When you access /HelloWorld, it is displayed as follows:
Now, let's proceed with creating the sample page as a site in IIS.
Build -> Publish [Project Name]
Web Server (IIS) -> Next
Web Deploy Package -> Next
Specify the location. -> Site name 지정 -> Finish
Click Publish.
It will be generated as shown below. Now, copy the files to the IIS server.
After copying, extract the files.
After extracting, move the files to a subfolder as shown below -> Copy the folder and files to the root directory (C:\Sample).
Copy completed.
Launch IIS Manager.
Sites -> Add Website
Proceed with the creation process as shown below. (For the certificate, specify the one that was previously created.)
Confirm that the creation is successful.
Application Pools -> Double-click on **Sample**.
.NET CLR version -> Change the setting to **No Managed Code**.
IISRESET
Access localhost to verify the setup.
Once DNS registration and certificate binding are completed, test the published URL.
When testing Exchange Online and M365, there are times when an environment related to Graph API is needed. In the past, I would have skipped anything related to development, but now ChatGPT can generate sample pages to some extent.
Without any prior development knowledge, I will build a test environment using the knowledge gained from ChatGPT, based on IIS. The ultimate goal is to integrate Microsoft Graph, and I will post about the necessary components along the way.
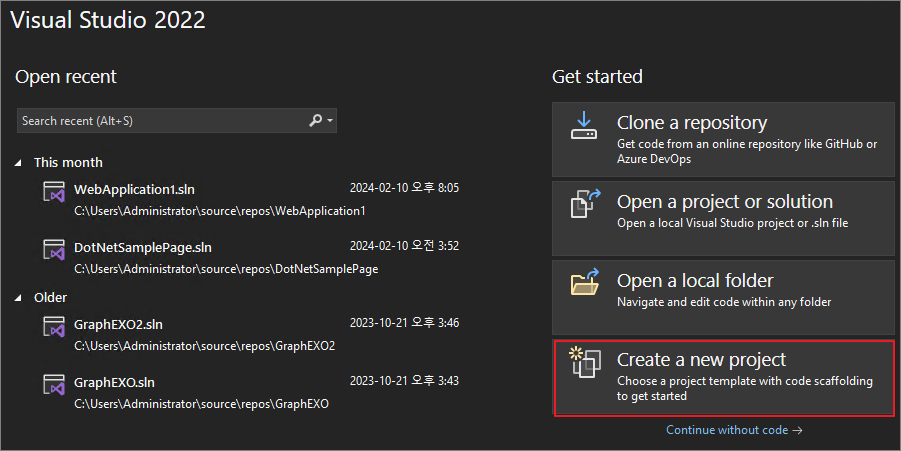
In this post, I will cover installing Visual Studio 2022 and configuring the IIS Server.
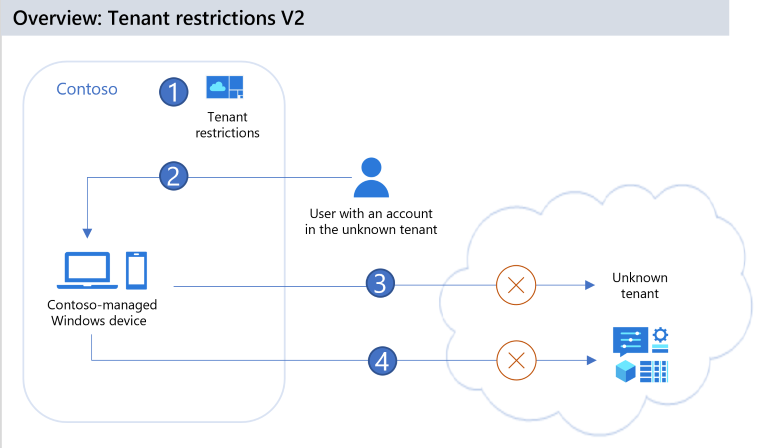
The primary purpose of Conditional Access is to prevent company accounts from being accessed on personal devices. However, Conditional Access cannot prevent other company accounts from being accessed on company devices.
Of course, if a company device can access Naver Mail and Google Drive, it means the company is not very concerned about data leakage, and you may disregard this post.
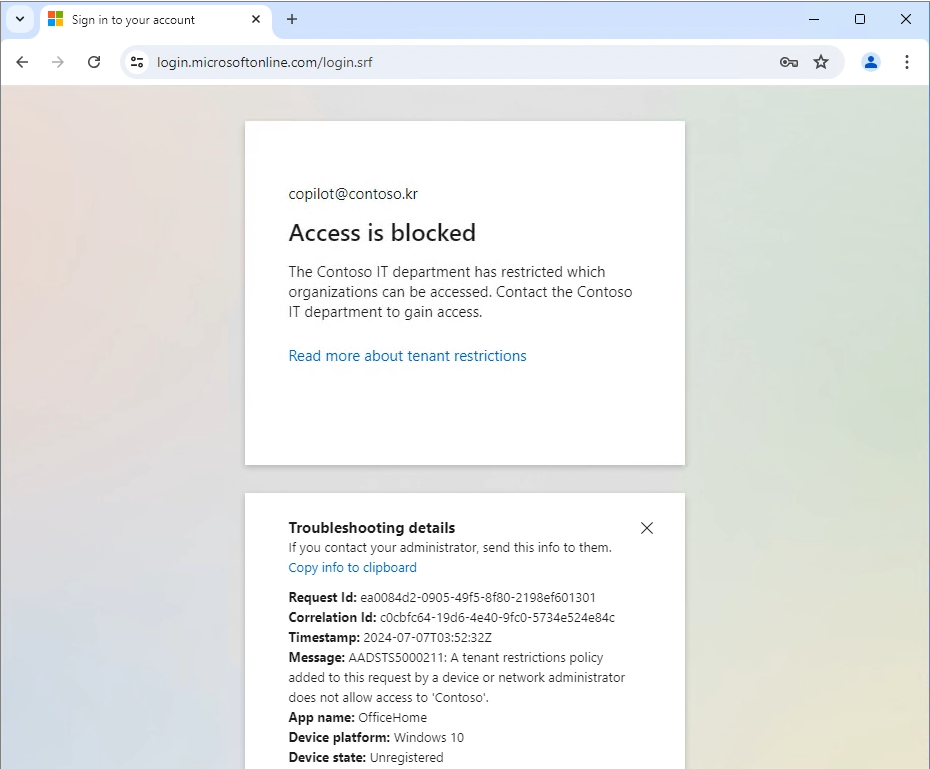
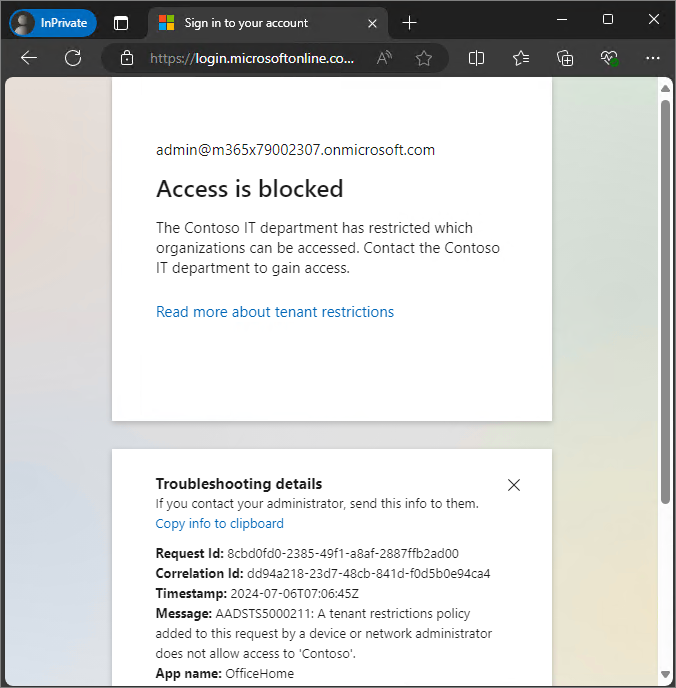
To use M365, you need to open MS-related URLs such as office.com. Tenant Restriction is a concept used to prevent access with other company or personal accounts (such as outlook.com) during this time.
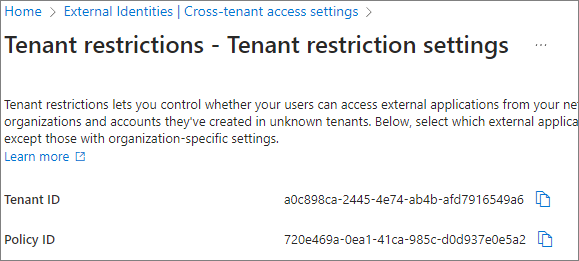
The Policy ID is generated as shown below. Make sure to copy each value and keep them.
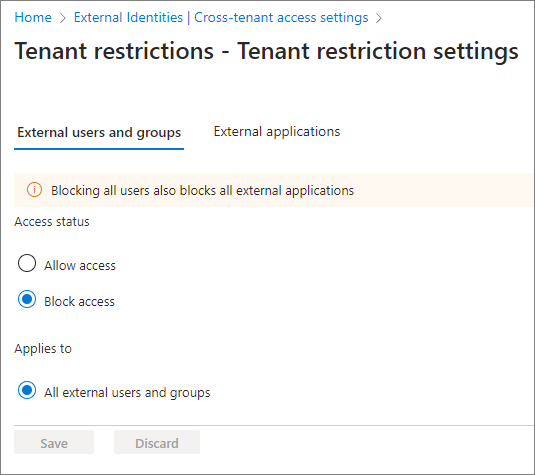
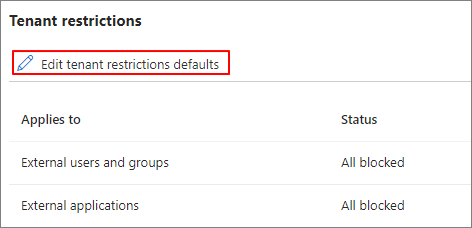
To set up a blocking policy for external accounts, configure it as shown below (default settings).
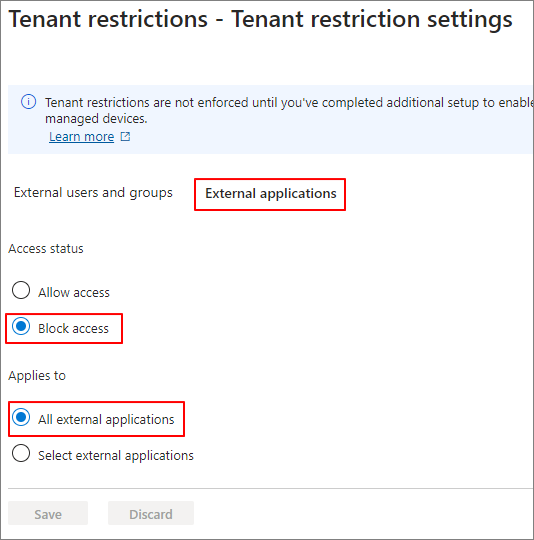
To block all external apps, configure the settings as shown below.
Step 2: Enable tenant restrictions on Windows managed devices (preview)
In the technical documentation, there are guidelines as shown below.
Tenant restrictions V2 on Windows is a partial solution that protects the authentication and data planes for some scenarios. It works on managed Windows devices and does not protect .NET stack, Chrome, or Firefox. The Windows solution provides a temporary solution until general availability of Universal tenant restrictions in Microsoft Entra Global Secure Access (preview).
-> Although the content is difficult to understand, it can be interpreted as indicating that the feature will be provided in a different way in the future. Currently, it is in the preview stage.
Download the ADMX files for the latest Windows GPO policies.
Once installed, the policy files will be saved to the following location.
Depending on the method of policy deployment in AD, copy the PolicyDefinitions folder to the appropriate location with only the necessary languages. (This part of the policy is related to AD, so we will not cover it here.)
Run gpmc.msc on the Domain Controller (DC).
Create a policy in the Organizational Unit (OU) that you will use for testing. Right-click and select "Edit".